
It started with a simple internet outage last Tuesday. At MyTechLogs Labs, we have redundant connections, but a primary ISP failure forced a failover. During that brief window of transition, I realized something terrifying: I couldn’t turn on the lamp on my desk.
I clicked the app on my phone. A spinning wheel appeared, followed by “Device Offline.” The lamp was plugged in right next to me. My local Wi-Fi was working perfectly. Yet, because a server somewhere across the ocean was unreachable, the smart plug controlling my lamp was essentially a plastic brick.
This is the dirty secret of the modern “Smart Home.” You don’t own it. You are just renting functionality from a cloud provider. Every time you turn on a light, adjust the thermostat, or check a security camera, that request travels out of your house to a foreign server, gets processed, and travels back. It introduces latency, it creates a massive privacy risk, and as I discovered, it introduces a single point of failure that cripples your home when the internet hiccups.
At the Labs, we don’t accept black boxes that we can’t control. I decided it was time to evict the cloud from my home. I embarked on a project to rip the stock, spy-friendly firmware off my cheap smart plugs and replace it with open-source, locally controlled software.
The Hidden Cost of Cheap IoT: Why the Cloud Must Go
To understand why I undertook this surgery, you need to understand the business model of cheap IoT (Internet of Things). You can buy a smart plug on Amazon for $8. How do they make money? They don’t make it on the hardware. They make it on the data.
Most generic smart devices use a backend platform like Tuya Smart. These devices are constantly “phoning home,” reporting their status, your usage patterns, and network information to servers often located in China or remote AWS instances.
Besides the obvious privacy nightmare—why does a server in another country need to know when I go to bed?—there is the issue of performance. This “cloud hop” adds anywhere from 200ms to a full second of latency to every action. In a truly smart home, lights should turn on instantly when motion is detected, not two seconds later when you have already walked past the sensor.
By “de-clouding” the device, we cut the internet cord. The device talks only to my local home automation server (Home Assistant) inside my network firewall. No internet required. No spying. Instant response times.
The Lab Setup: Tools for Digital Surgery
This is not a software-only fix. You cannot just download an app to remove the manufacturer’s grip on the hardware. We have to physically break into the device and force it to accept new programming.
MyTechLogs Labs Workbench Setup:
- Target Device: 4x Generic “Smart Life” 10A Wi-Fi Plugs (Tuya-based).
- Interface: CP2102 USB-to-TTL Serial Converter (this allows my PC to talk directly to the chip’s raw data pins).
- Soldering Gear: temperature-controlled soldering station with a fine conical tip, lead-free solder, and flux pen.
- Software Environment: An old Lenovo ThinkPad running Ubuntu 24.04 LTS, pre-loaded with
esptool.py(a Python tool for talking to Espressif chips). - New Firmware: Tasmota (a lightweight, open-source firmware designed specifically for local control of ESP-based devices).
Cracking the Case: Identifying the Brain
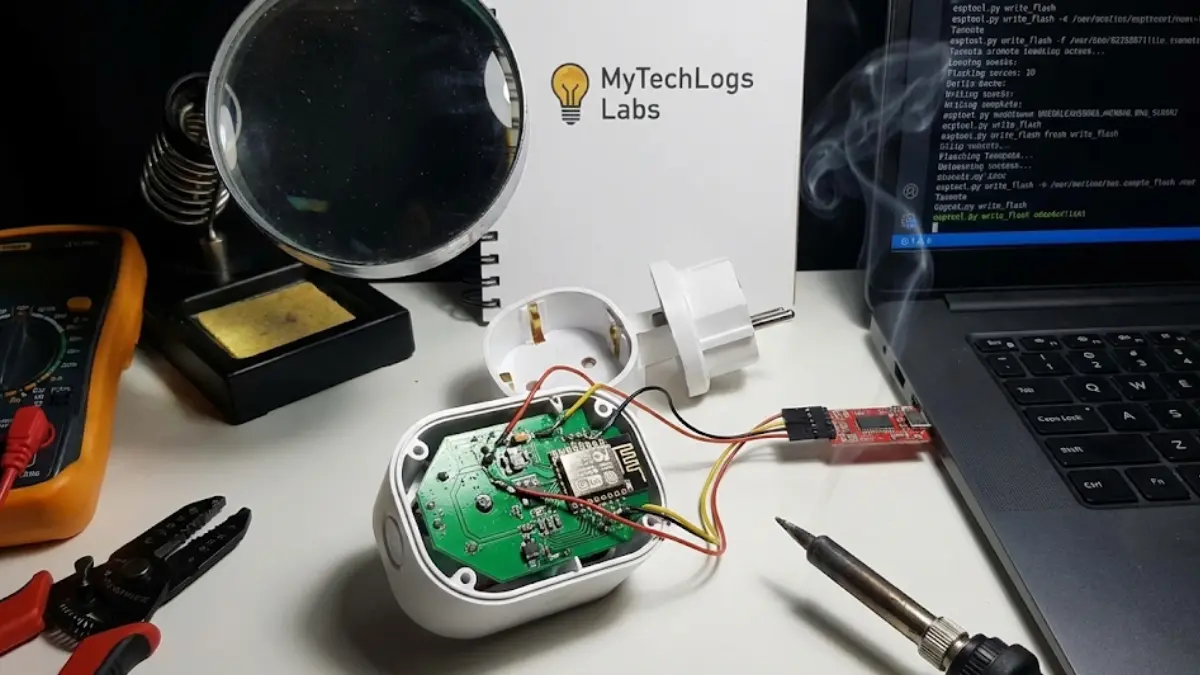
The first step is the most destructive. These plugs are ultrasonically welded shut; they are not meant to be opened. I had to use a spudger, a heat gun, and a fair amount of brute force to crack the casing open without destroying the internal PCB (Printed Circuit Board).
Once inside, I needed to identify the “brain.” Most cheap IoT devices use a chip from Espressif Systems, either an ESP8266 or an ESP32. These chips are incredibly popular because they are cheap, have built-in Wi-Fi, and, crucially, they have a “bootloader mode” that allows you to overwrite their memory if you can physically access the right pins.
Under the microscope, I identified the chip on my plugs: a Tuya TYWE2S module, which is basically an ESP8266 in disguise. To flash it, I needed access to four specific connection points on that tiny board:
- VCC (3.3V Power)
- GND (Ground)
- TX (Transmit Data)
- RX (Receive Data)
Furthermore, to force the chip into “programming mode” instead of normal boot mode, a fifth pin, GPIO0, must be connected to Ground during power-up.
The “Soldering Surgery” Protocol
This is where steady hands are required. The pads on these chips are microscopic. I taped the PCB down to my anti-static mat. Using the flux pen, I dabbed the five target pads.
I didn’t solder permanent wires. Instead, I used “DuPont” jumper wires with one end cut off, tinned the exposed wire with solder, and quickly tacked them onto the tiny pads on the chip module. It looked messy, a spiderweb of colorful wires hanging off a cheap green board, but it only needed to hold for the 60 seconds it takes to flash the firmware.
I connected the RX and TX wires to my USB-to-TTL adapter (remembering to cross them: TX goes to RX, RX goes to TX). I connected the GND wire. Before connecting the final 3.3V power wire, I used an alligator clip to short GPIO0 to Ground.
With GPIO0 grounded, I plugged the 3.3V wire into the adapter. The chip powered up.
The Verification Log Box
The moment of truth. I turned to my Ubuntu laptop terminal. If my soldering was good, the chip would wake up and wait for instructions. I ran a query command using esptool.py to check the connection.
Here is the actual log output from the terminal confirming we had successfully hijacked the hardware.
MyTechLogs Labs – IoT Firmware Intrusion Log [ID: ESP-FLASH-04]
Bash
labuser@thinkpad:~$ esptool.py --port /dev/ttyUSB0 chip_id
esptool.py v4.6.2
Serial port /dev/ttyUSB0
Connecting....
Detecting chip type... ESP8266
Chip is ESP8266ex
Features: WiFi, WPA2, WEP, TKIP, AES
Crystal is 26MHz
MAC: 68:c6:3a:xx:xx:xx
Uploading stub...
Running stub...
Stub running...
Chip ID: 0x00d3XXXX
[STATUS] CONNECTION: SUCCESSFUL. Chip in UART Bootloader Mode. TARGET ACQUIRED: Ready for firmware erasure.
Wiping the Slate Clean and Installing Tasmota
With the connection verified, the original Tuya firmware didn’t stand a chance.
First, I nuked the existing brains of the operation. I ran the command esptool.py erase_flash. In about 10 seconds, the proprietary code that had been sending my data to China was gone forever. The chip was now completely blank.
Next, I downloaded the latest tasmota.bin firmware file. Tasmota is beautiful because it is a web server in a 500kb file. Once installed, the smart plug hosts its own little website that you can visit to configure it.
I ran the flash command: esptool.py write_flash 0x0 tasmota.bin
The terminal showed a progress bar as the new, locally-controlled brain was uploaded to the ESP8266 chip. Once it hit 100%, I disconnected the power, removed the temporary GPIO0 grounding wire, and powered it back up.
A new Wi-Fi network appeared on my phone called “tasmota-XXXX”. I connected to it, entered my home Wi-Fi credentials, and the plug rebooted onto my local network.
The Results: Instant, Private Control
The difference is night and day. I opened a web browser and typed in the local IP address of the newly flashed plug. A simple, fast interface loaded instantly. I clicked “Toggle,” and the relay in the plug clicked immediately. There was zero perceivable lag.
I integrated the plug into my Home Assistant server using the MQTT protocol (a lightweight messaging protocol for IoT). Now, when an automation runs—like turning on the lamp when I walk into the room—it happens instantly.
More importantly, I checked my firewall logs on my pfSense router. Before the surgery, these plugs were attempting DNS lookups for foreign servers every 30 seconds. Now? Silence. They only talk to my local server.
The Risks and Rewards of Hardware Hacking
I won’t lie to you; this process is risky. You are dealing with mains electricity devices (never work on them while plugged into the wall!). Opening the case voids the warranty instantly. If your soldering iron slips, you can bridge pins on the chip and brick the device permanently. I destroyed one of the four plugs I attempted this on because I lifted a delicate copper pad off the PCB with too much heat.
But the reward is true ownership. In an era where everything is a subscription and everything is tracked, taking a physical device, breaking it open, and forcing it to serve only you is a profoundly satisfying act of digital rebellion.
At MyTechLogs Labs, we believe that if you can’t open it, you don’t own it. My lamps might be cheap, but now, they are truly mine.