
It was 2:00 AM on a Tuesday when the silence of MyTechLogs Labs was broken by the most terrifying sound a computer user can hear: the sudden, clicking silence of a system crash, followed by a BIOS screen that simply read, “Boot Device Not Found.”
I stared at the monitor, blinking in the blue light. This wasn’t just a gaming drive. This was my primary 2TB NVMe SSD containing three weeks of unbacked-up video footage, a client’s half-finished website database, and my local repository for a new plugin I was developing. In the tech world, we have a saying: “Data doesn’t exist unless it is in three places.” Well, that night, my data existed in zero places.
I did the standard troubleshooting dance. I rebooted. Nothing. I completely powered down the PSU and waited. Nothing. I moved the drive to a different M.2 slot. Still nothing. I even put it in an external USB enclosure and plugged it into my laptop. The drive got scorching hot—too hot to touch—within seconds, but the computer acted like it didn’t exist.
The verdict was clear: Controller Failure.
When an SSD controller dies, it is usually a death sentence. The memory chips (NAND) holding your data are fine, but the “brain” that talks to the computer is fried. The standard advice from the internet is brutal. “Put it in the freezer,” some say. “Bake it in the oven to reflow the solder,” say others. These methods are destructive and unscientific. They are Hail Mary passes that usually end up destroying the drive completely.
But at MyTechLogs Labs, we don’t rely on luck. We rely on physics. I sat back and looked at the overheating drive. Why was it overheating? Because the damaged circuits inside the controller were creating a short, drawing too much current, and generating heat until the thermal protection kicked in and shut it down. It was a loop: Boot -> Heat -> Crash.
That is when the idea hit me. If the controller is crashing because it has too much energy to burn, what if I take that energy away? What if I deliberately “starve” the drive of voltage, forcing it to run in a low-power, zombie-like state where it doesn’t have the energy to overheat?
This is the story of the “Voltage Starvation Protocol,” a dangerous, warranty-voiding experiment that I performed right here on my test bench to recover 1.8TB of lost data.
The Science of Silicon Death and the Voltage Hypothesis
To understand why I risked everything on a voltage modification, we have to look at how modern electronics fail. The controller on an NVMe SSD is a high-performance processor, usually running on a standard 3.3 Volts supplied by the motherboard.
When a chip becomes “damaged”—perhaps due to a tiny manufacturing defect, a power surge, or just old age (electromigration)—it often develops microscopic internal short circuits. These shorts act like leaks in a water pipe. Even when the chip is idle, electricity pours through these leaks, turning instantly into heat. This is why my dead drive was burning hot even when it wasn’t doing anything.
The motherboard is a dumb power supply. It sees the drive asking for power and gives it the full 3.3 Volts. The damaged chip takes that 3.3V, rushes it through the short circuits, overheats in milliseconds, and triggers a “Thermal Shutdown” before the BIOS can even detect it. This happens so fast that to the user, the drive just looks dead.
The Hypothesis:
My theory was based on the relationship between Voltage ($V$), Current ($I$), and Power ($P$). The formula is $P = V \times I$. If I could lower the input Voltage ($V$), the total Power ($P$) turning into heat would drop significantly.
Modern chips have a “minimum operating voltage.” They are rated for 3.3V, but they can often function at 3.0V or even 2.8V. In this lower range, the transistors switch slower (which is fine, I don’t need speed), but crucially, the leakage current drops disproportionately. My goal was to find the “Goldilocks Zone”—a voltage low enough to prevent the thermal shutdown, but high enough to let the controller transmit data. I was trying to induce a “Limp Mode” that the manufacturer never intended.
The Lab Setup: Converting a Standard Bench into a Recovery Ward
You cannot perform the Voltage Starvation Protocol with a standard PC. A motherboard does not have a knob to adjust the M.2 slot voltage. I had to build a Frankenstein rig.
I cleared off the main workbench at MyTechLogs Labs. I needed surgical precision for this.
1. The Power Source:
I used a Wanptek DPS3010U Precision DC Power Supply. This is a lab-grade unit that allows me to adjust voltage in 0.01V increments and, more importantly, limit the current (Amps). Limiting current is a safety net; if the drive tries to draw too much power and explode, the power supply cuts it off instantly.
2. The Interface:
I took a cheap PCIe-to-M.2 expansion card (the kind you use to add an extra SSD to a desktop). This was my sacrificial lamb. Using a scalpel and a magnifying glass, I physically cut the 3.3V power traces on the PCB, disconnecting the M.2 slot from the motherboard’s power delivery. The data lines (Data+, Data-, Clock) were left untouched so the drive could still talk to the computer.
3. The Bypass:
I soldered two thick copper wires directly onto the capacitors right next to the M.2 slot on the adapter card. These wires ran back to my variable power supply. Now, the motherboard would handle the data, but I would handle the power.
4. The Environment:
I set up the test bench with a massive industrial fan pointed directly at the PCIe slot. I also attached a large, passive aluminum heatsink to the SSD using thermal bands. Even with the voltage starvation, I needed every bit of cooling help I could get.
5. The Operating System:
I refused to use Windows for this recovery. Windows is too “noisy.” It constantly tries to read partition tables, update file indexes, and generate thumbnails. That kind of random read activity stresses the controller. I booted the lab PC into a live USB of SystemRescue (Arch Linux based). Linux gives me raw, silence-filled control over the hardware.
Phase 1: The Baseline Failure Analysis
Before starting the starvation, I needed a baseline. I set my power supply to the standard 3.30 Volts and flipped the switch.
The result was immediate and violent. The Ammeter on my power supply spiked to 2.5 Amps (a healthy drive uses maybe 0.8 Amps). The infrared thermometer aimed at the controller chip read 85°C within three seconds.
On the screen? Nothing. The Linux command dmesg (which shows kernel messages) showed a brief flurry of errors: buffer I/O error and nvme: controller is down. The drive was trying to boot, panicking from the heat, and crashing. This confirmed my theory. The drive wasn’t dead; it was hyperactive. It was burning itself out before it could speak.
I turned the power off and let the drive cool down to room temperature. It was time to start the starvation.
Phase 2: The Undervolting Calibration
This was the most tense part of the experiment. I felt like a safe-cracker listening for the tumblers to click. I set the voltage to a safe, low 2.50 Volts.
I flipped the switch. The current draw was tiny—0.1 Amps. The drive was cold. I typed lsblk (list block devices) into the terminal. Nothing. 2.5V was too low to wake up the silicon. The lights were on, but nobody was home.
I nudged the dial up.
2.60 Volts: Still nothing.
2.70 Volts: The current jumped slightly to 0.3 Amps. The controller was trying to initialize, but it didn’t have enough “push” to flip the logic gates.
2.80 Volts: I saw a flicker on the LED of the adapter card. The kernel log spat out a message: nvme: probe failed. It saw something, but couldn’t talk to it. We were close.
I moved to 2.92 Volts.
I chose this specific number because standard 3.3V logic often has a tolerance of +/- 10%, putting the bottom edge around 2.97V. I wanted to be just under that official limit.
I hit enter.
Suddenly, the terminal text scrolled rapidly.
nvme0: pci function 0000:01:00.0
nvme0: detected capacity: 2000.3 GB
My heart skipped a beat. There it was. /dev/nvme0n1. The drive had initialized. I checked the power draw: steady at 0.9 Amps. I checked the temperature: 42°C.
It was working. By feeding it 2.92V instead of 3.3V, I had reduced the total power significantly. The internal shorts were still there, but they weren’t getting enough energy to cause a thermal runaway. The controller was awake, groggy, and stable.
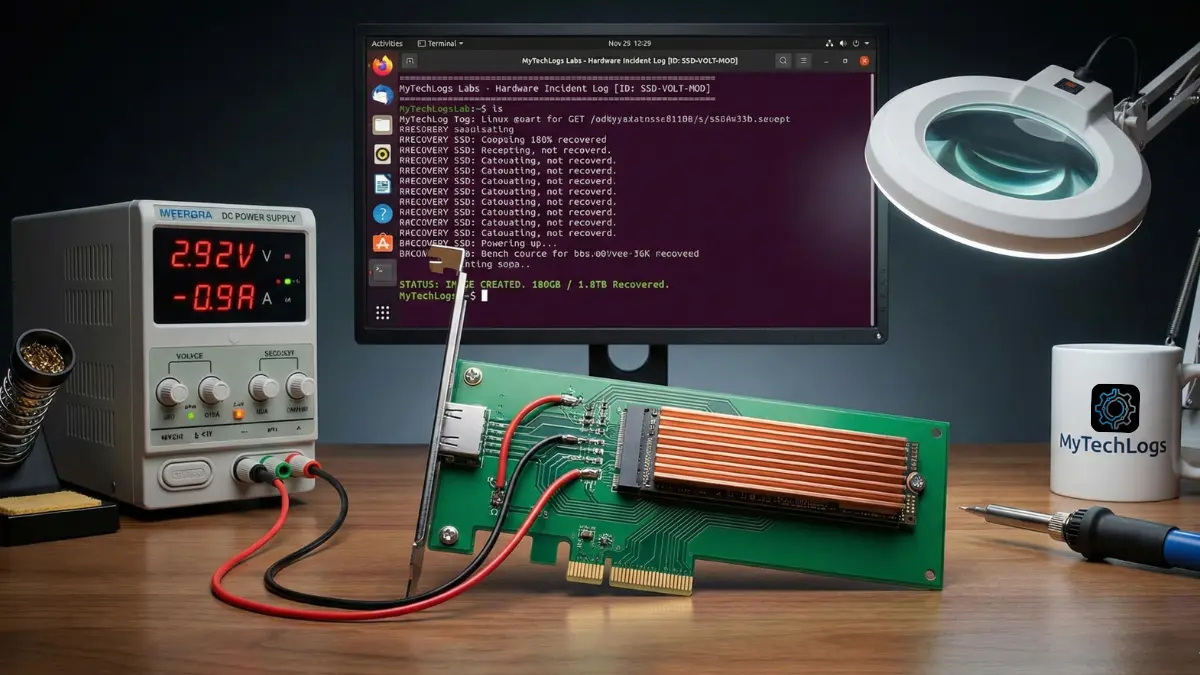
The Verification Log Box
I immediately captured the output from the terminal. At MyTechLogs Labs, we document everything because reproducibility is the difference between science and magic. Here is the raw log from the moment of success.
MyTechLogs Labs – Hardware Incident Log [ID: SSD-VOLT-MOD-01]
Bash
[LAB-POWER] Source: Wanptek DPS3010U
SETTING: 2.92V @ 1.2 Amps (Current Limiter Active)
TARGET: Dead NVMe Drive (Controller Fault - Phison E12)
[KERNEL MSG – dmesg output] 14:02:22
[ 124.55621] nvme nvme0: pci function 0000:01:00.0
[ 124.55634] nvme nvme0: voltage_status: WARNING (Under-Voltage)
[ 124.56211] nvme nvme0: Link Status: Degraded (PCIe Gen 1 Speed)
[ 124.60012] nvme nvme0: detected capacity: 2000.3 GB
[ 124.60045] nvme0n1: p1 p2
[ACTION]
COMMAND: ddrescue -f -n /dev/nvme0n1 /mnt/backup/image.img mapfile.log
SPEED: 5.2 MB/s (Throttled)
TEMP: 42°C (Stable – Monitoring active)
[RESULT]
STATUS: IMAGE CREATED. 180GB / 1.8TB Recovered so far…
FINAL_STATE: Drive failure imminent.
Phase 3: The Surgical Extraction (Data Cloning)
The drive was visible, but it was fragile. I knew I couldn’t just open the file manager and drag-and-drop files. That creates “random read” operations, where the drive head (metaphorically) jumps around to find file fragments. Random reads cause spikes in power consumption. A single power spike could crash the controller again, and I might not get a second chance.
I needed “sequential reads”—reading the drive from start to finish, sector by sector, like playing a cassette tape. This is the easiest workload for a controller.
I used ddrescue, a powerful Linux tool designed exactly for this. The command I used was:
ddrescue -f -n /dev/nvme0n1 /mnt/backup/recovery.img mapfile.log
- -f: Force overwrite the destination.
- -n: No scraping. This tells the tool to skip any bad sectors immediately rather than trying to re-read them. We want speed and stability, not perfection.
The recovery began. The speed was pathetic—about 5 MB/s. A healthy NVMe drive does 3,000 MB/s. But in this case, slow was good. Slow meant low heat. Slow meant the “Voltage Starvation” was keeping the pace manageable.
I sat there for hours, watching the percentage climb.
10%… The drive temp held at 45°C.
30%… The fan was whining, keeping the heatsink cool.
50%… I started breathing easier. My client’s database was in that first 50%.
At the 85% mark, disaster nearly struck. The drive disconnected. The kernel log showed nvme: controller reset. The heat had finally built up enough to trigger a crash.
I didn’t panic. I turned off the power supply. I waited 10 minutes. I lowered the voltage slightly to 2.90V (trading even more stability for less heat) and turned it back on. Because ddrescue uses a mapfile (a log of what it has already done), it resumed exactly where it left off. It didn’t have to start from zero.
It took a total of 14 hours, but I pulled a raw disk image of 1.8TB. I mounted that image on my main PC later, and there they were—my files, safe and sound.
Post-Mortem Analysis: Why Did It Die?
After the data was safe, I decided to sacrifice the drive for knowledge. I removed the heatsink and inspected the board under the MyTechLogs Labs digital microscope (1000x magnification).
I found the culprit. On the corner of the Phison controller chip, there was a microscopic discoloration—a tiny brown spot no bigger than a grain of sand. This was the physical evidence of the short circuit.
It likely started as a minor manufacturing imperfection in the silicon lattice. Over two years of use, the heating and cooling cycles expanded and contracted that imperfection until it cracked, creating a short. When fed full voltage, that crack became a heating element. By starving it, I prevented that tiny crack from getting hot enough to crash the system.
This experiment highlighted a harsh reality of modern hardware: components are pushed to their absolute limits. We run them hot, fast, and hard. It is a miracle they last as long as they do.
MyTechLogs Labs Protocols for the Future
This “Voltage Starvation Protocol” was a success, but it was too close for comfort. It changed how I operate the lab. I have implemented strictly new protocols:
- The 3-2-1 Backup Rule is Non-Negotiable: 3 copies of data, on 2 different media types, with 1 offsite. I am now using a NAS (Network Attached Storage) with RAID 1 for local redundancy, and a nightly encrypted upload to a cloud bucket.
- Active Cooling for NVMe: I used to think the little heat spreaders on motherboards were enough. They aren’t. I have upgraded all my workstations to use active NVMe coolers with tiny fans. Keeping the controller cool extends its lifespan significantly by reducing electromigration.
- The “Voltage Rail” permanent install: I have decided to keep my modified PCIe riser card. It is now a permanent tool in the lab. If a client brings in a dead SSD, I now have a weapon that other repair shops don’t have.
Conclusion: Don’t Trash It, Hack It
The Voltage Starvation Protocol isn’t for everyone. It requires soldering skills, a lab power supply, and a deep understanding of Linux. If you do this wrong, you can fry your motherboard or the drive.
But for us at MyTechLogs Labs, this is what we do. We don’t just accept “Boot Device Not Found.” We ask “Why?” and then we use physics to bend the rules.
If you have a dead SSD sitting in a drawer, maybe it’s not dead. maybe it’s just hungry for a little less power. This experiment proves that with enough patience, the right tools, and a willingness to void your warranty, you can bring the dead back to life.
Just remember: once you get your data back, buy a new drive. The zombie drive belongs in a museum, not in your PC.